Explain the realistic gameplay of RenderToTexture in detail! Cocos Creator implements FPS classic sight + monitor.
Introduction
In the past two weeks, “Cocos Star Writer” Nowpaper used RenderToTexture technology to create an optical illusion effect of “Dream in a Cage.” This time Nowpaper will continue to expand the usage of RenderToTexture.
RenderToTexture is a very interesting technology. It can render a camera image into a texture and then combine it with a material to display a Mesh as a specified image. In-game development is widely used to implement mirrors, monitor screens, scopes, portals, and even user interface displays, dynamic texture spraying, etc.
In versions after Cocos Creator 3.4, the RenderToTexture technology has been relatively perfect and more convenient to use. In my previous portal sharing, the pictures in the portal were implemented using this technology. At that time, some code had to be written, but now you can easily achieve renderable textures by editing them in the editor.
Today we will continue to expand, use RenderToTexture to make a scope and display the screen monitor of the specified camera.
PS. See the end of the article for source code and video tutorials. This time, v3.5 is used.
Prepare
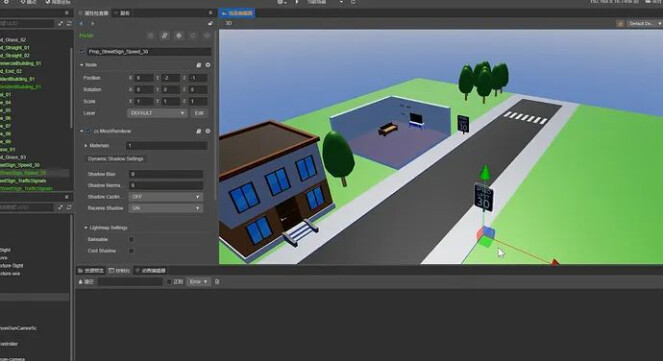
First, create a new project and build the game scene. I’ll build a simple street with some objects to make the scene look a little less monotonous.
Sight
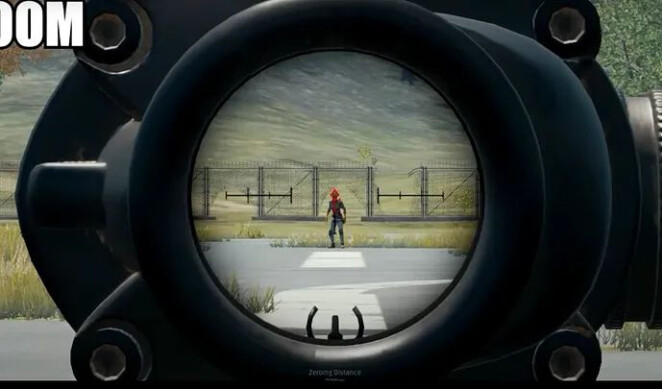
Generally speaking, when the character is aiming, we can see that the displayed picture is enlarged in the lens, and the vision is more forward.
The principle of this effect is actually: add a camera to the aiming position of the firearm and then render the camera image to a texture.
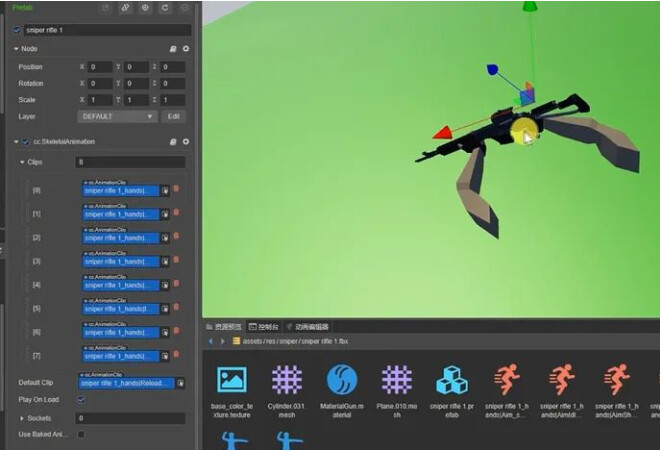
That way, things are simple. I prepared a firearm with an aiming animation and now add the first-person camera to it and adjust it to make it look more appropriate.
Now create a new renderable texture:
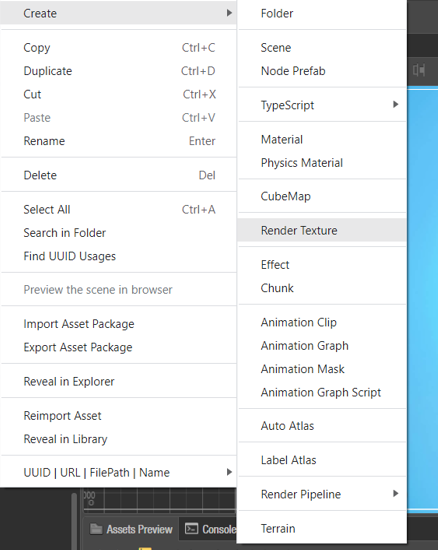
The default value of the image width and height is 1, which needs to be modified according to our own situation, usually according to the size ratio of the viewport. If you want to fit perfectly, it is best to do some control in the code. Here we directly use 512x512:

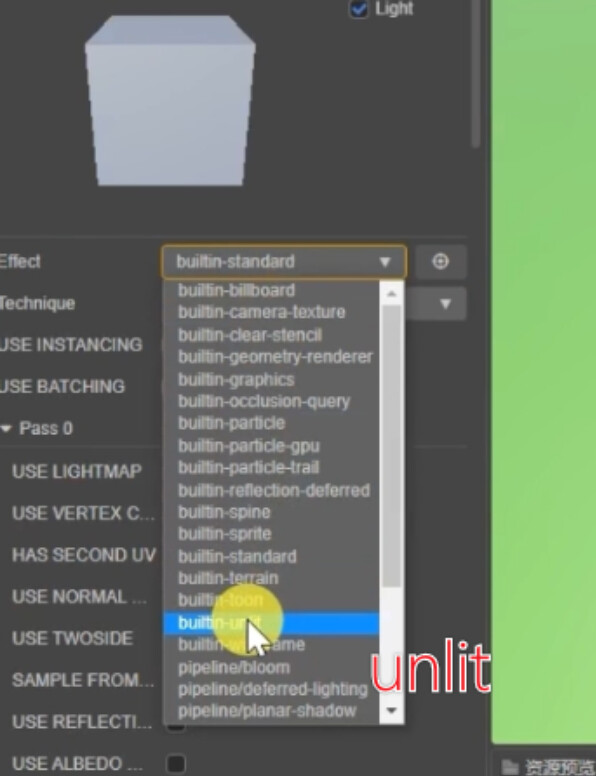
Now create another material:
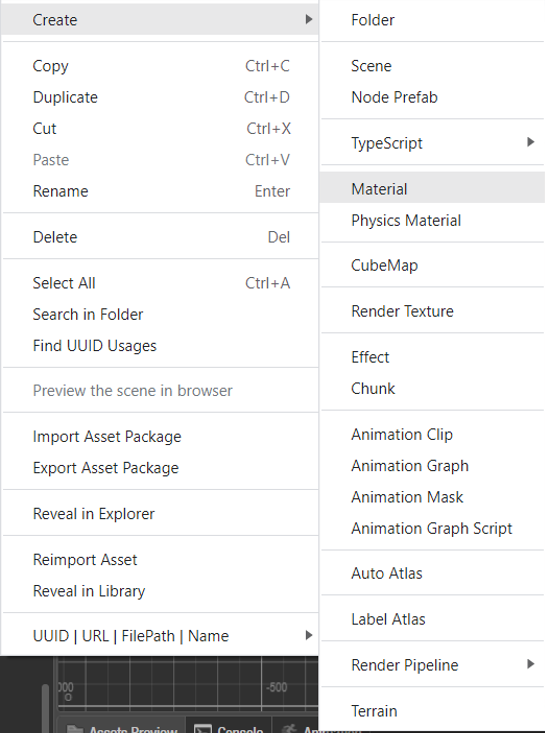
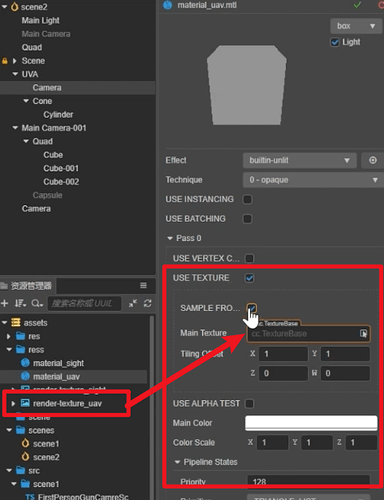
Shader selection is built-in-unlit:
Turn on UseTexture, check the RTTexture option, and drag the newly created renderable texture into the following reference:

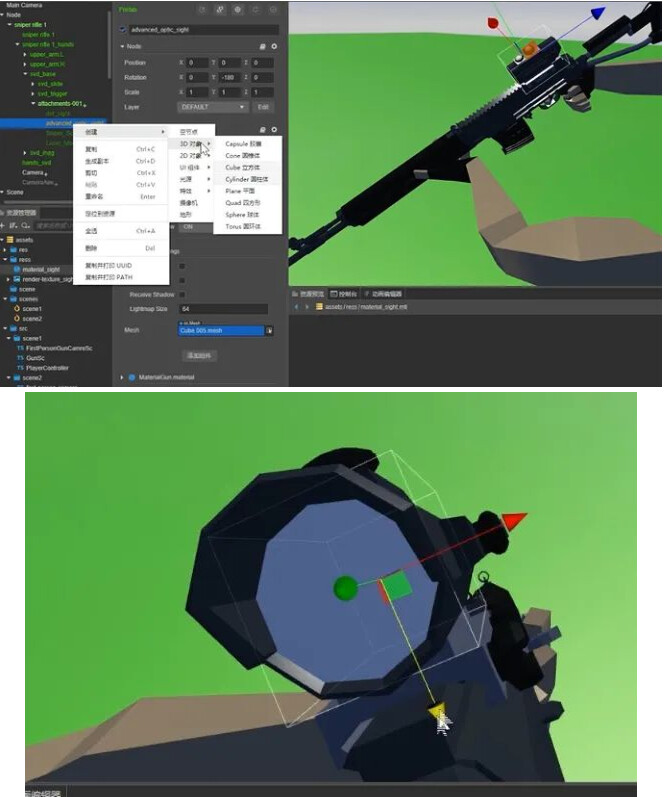
Now create a circular patch for the scope. Generally speaking, the modeler will provide one. Here we will directly put a cylindrical shape and adjust it to the corresponding Node through the node:
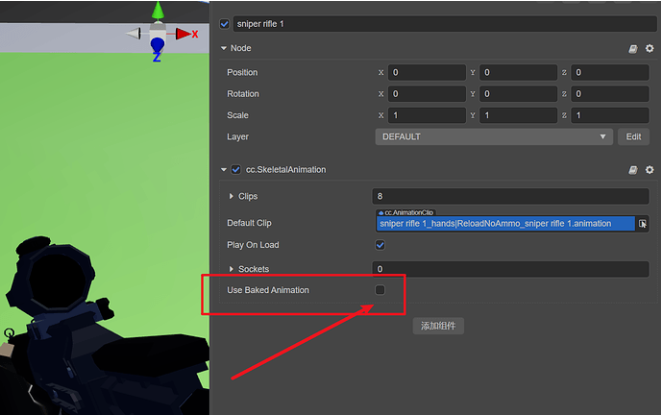
Now select the animation of the firearm and remove the animation pre-bake:
Regarding the animation control script, it is not provided here, just play the specified animation:
Select the cylinder and change its material to the scope material you just created:
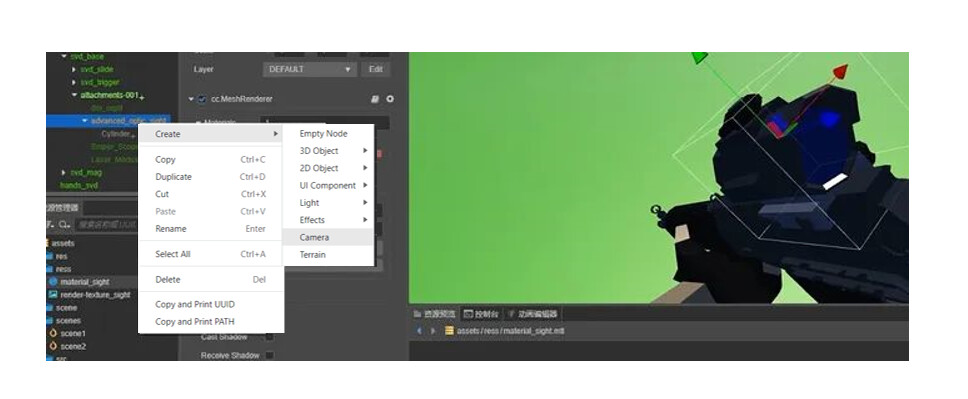
Next, add a camera to the aiming component and adjust the position. The shooting magnification can directly modify the Fov value:
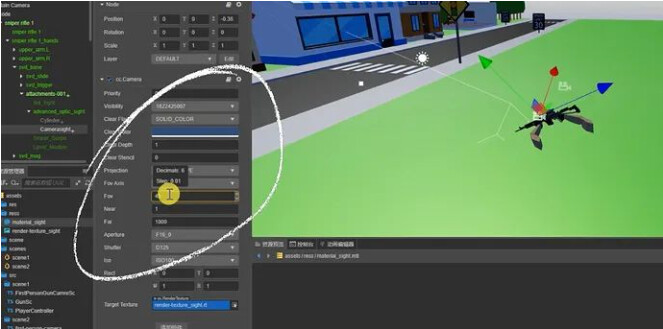
According to the camera preview screen, pull down to the bottom after adjusting the value. In RenderToTexture, drag the previously created renderable texture named “Scope” into it:

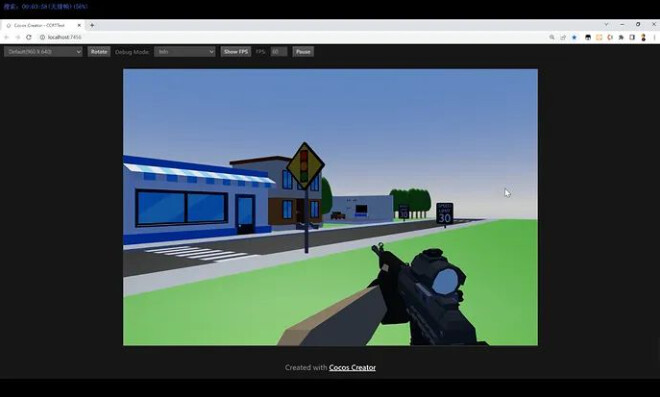
We may see the effect in the editor if all goes well. Now run it (I used a custom script here to make the aiming action look more accurate), you can see that there is already a zoomed-in picture in the scope, let’s move around and aim at different places:
So far, the creation of the scope has been done. Isn’t it very simple? Let’s try the monitor effect.
Monitor
In many games, players can see the data from the camera through the monitor screen, and this kind of effect is also achieved using RenderToTexture. This time we will make a drone control board + a street camera.
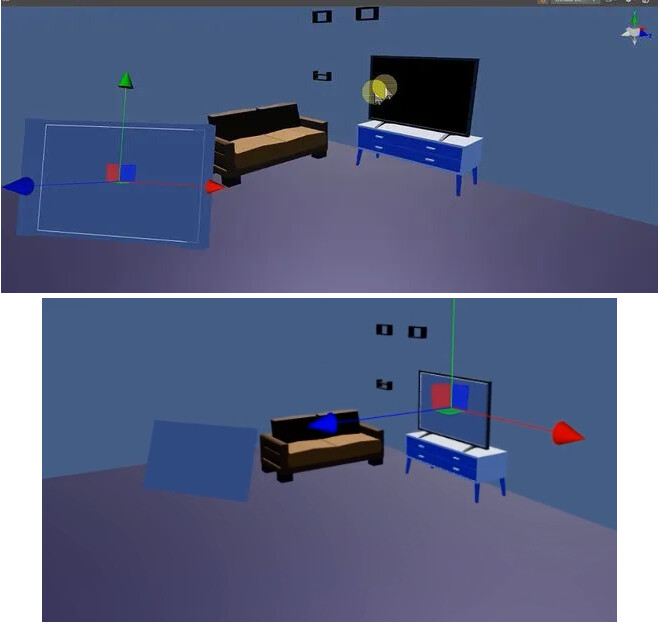
We also use the street scene built earlier. In this room scene, we use a frame to represent the drone control panel; and the monitor screen is projected directly to the TV. Once these two are done, place the patch in space to the exact location, and place a camera to observe the scene:
Create a new renderable texture, name it “drone,” create a material, select built-in-unlit for the shader, select UseTexture, check RT, and select the corresponding renderable texture below. Here we will not create the rendering texture and material of the monitor, and we will just use the previous scope directly:
Now create two cameras separately, and make the drone simply look like a small plane for the convenience of observation:

Then place the street camera and look down, and make some scripts appropriately to complete the control. These scripts are as follows:
first-person-camera.ts from the official example project:
import { _decorator, Component, math, systemEvent, SystemEvent, KeyCode, game, cclegacy, Touch, EventKeyboard, EventMouse } from "cc";

const { ccclass, property, menu } = _decorator;
const v2_1 = new math.Vec2();
const v2_2 = new math.Vec2();
const v3_1 = new math.Vec3();
const qt_1 = new math.Quat();
const id_forward = new math.Vec3(0, 0, 1);

const KEYCODE = {
 W: 'W'.charCodeAt(0),
 S: 'S'.charCodeAt(0),
 A: 'A'.charCodeAt(0),
 D: 'D'.charCodeAt(0),
 Q: 'Q'.charCodeAt(0),
 E: 'E'.charCodeAt(0),
 w: 'w'.charCodeAt(0),
 s: 's'.charCodeAt(0),
 a: 'a'.charCodeAt(0),
 d: 'd'.charCodeAt(0),
 q: 'q'.charCodeAt(0),
 e: 'e'.charCodeAt(0),
 SHIFT: KeyCode.SHIFT_LEFT ,
};

@ccclass("COMMON.FirstPersonCamera")
@menu("common/FirstPersonCamera")

export class FirstPersonCamera extends Component {

 @property
 moveSpeed = 1;
 @property
 moveSpeedShiftScale = 5;
 @property({ slide: true, range: [0.05, 0.5, 0.01] })
 damp = 0.2;
 @property
 rotateSpeed = 1;
 _euler = new math.Vec3();
 _velocity = new math.Vec3();
 _position = new math.Vec3();
 _speedScale = 1;
 onLoad() {
  math.Vec3.copy(this._euler, this.node.eulerAngles);
  math.Vec3.copy(this._position, this.node.position);
 }

onDestroy() {
  this._removeEvents();
 }

onEnable() {
  this._addEvents();
 }

onDisable() {
  this._removeEvents();
 }

update(dt: number) {
  // position
  math.Vec3.transformQuat(v3_1, this._velocity, this.node.rotation);
  math.Vec3.scaleAndAdd(this._position, this._position, v3_1, this.moveSpeed * this._speedScale);
  math.Vec3.lerp(v3_1, this.node.position, this._position, dt / this.damp);
  this.node.setPosition(v3_1);
  // rotation
  math.Quat.fromEuler(qt_1, this._euler.x, this._euler.y, this._euler.z);
  math.Quat.slerp(qt_1, this.node.rotation, qt_1, dt / this.damp);
  this.node.setRotation(qt_1);
 }

private _addEvents() {
  systemEvent.on(SystemEvent.EventType.MOUSE_WHEEL, this.onMouseWheel, this);
  systemEvent.on(SystemEvent.EventType.KEY_DOWN, this.onKeyDown, this);
  systemEvent.on(SystemEvent.EventType.KEY_UP, this.onKeyUp, this);
  systemEvent.on(SystemEvent.EventType.TOUCH_MOVE, this.onTouchMove, this);
  systemEvent.on(SystemEvent.EventType.TOUCH_END, this.onTouchEnd, this);
 }

 private _removeEvents() {
  systemEvent.off(SystemEvent.EventType.MOUSE_WHEEL, this.onMouseWheel, this);
  systemEvent.off(SystemEvent.EventType.KEY_DOWN, this.onKeyDown, this);
  systemEvent.off(SystemEvent.EventType.KEY_UP, this.onKeyUp, this);
  systemEvent.off(SystemEvent.EventType.TOUCH_MOVE, this.onTouchMove, this);
  systemEvent.off(SystemEvent.EventType.TOUCH_END, this.onTouchEnd, this);
 }

 onMouseWheel(e: EventMouse) {
  const delta = -e.getScrollY() * this.moveSpeed / 24; // delta is positive when scroll down
  math.Vec3.transformQuat(v3_1, id_forward, this.node.rotation);
  math.Vec3.scaleAndAdd(v3_1, this.node.position, v3_1, delta);
  this.node.setPosition(v3_1);
 }

 onKeyDown(e: EventKeyboard) {
  const v = this._velocity;
  if (e.keyCode === KEYCODE.SHIFT) { this._speedScale = this.moveSpeedShiftScale; }
  else if (e.keyCode === KEYCODE.W || e.keyCode === KEYCODE.w) { if (v.z === 0) { v.z = -1; } }
  else if (e.keyCode === KEYCODE.S || e.keyCode === KEYCODE.s) { if (v.z === 0) { v.z = 1; } }
  else if (e.keyCode === KEYCODE.A || e.keyCode === KEYCODE.a) { if (v.x === 0) { v.x = -1; } }
  else if (e.keyCode === KEYCODE.D || e.keyCode === KEYCODE.d) { if (v.x === 0) { v.x = 1; } }
  else if (e.keyCode === KEYCODE.Q || e.keyCode === KEYCODE.q) { if (v.y === 0) { v.y = -1; } }
  else if (e.keyCode === KEYCODE.E || e.keyCode === KEYCODE.e) { if (v.y === 0) { v.y = 1; } }
 }

onKeyUp(e: EventKeyboard) {
  const v = this._velocity;
  if (e.keyCode === KEYCODE.SHIFT) { this._speedScale = 1; }
  else if (e.keyCode === KEYCODE.W || e.keyCode === KEYCODE.w) { if (v.z < 0) { v.z = 0; } }
  else if (e.keyCode === KEYCODE.S || e.keyCode === KEYCODE.s) { if (v.z > 0) { v.z = 0; } }
  else if (e.keyCode === KEYCODE.A || e.keyCode === KEYCODE.a) { if (v.x < 0) { v.x = 0; } }
  else if (e.keyCode === KEYCODE.D || e.keyCode === KEYCODE.d) { if (v.x > 0) { v.x = 0; } }
  else if (e.keyCode === KEYCODE.Q || e.keyCode === KEYCODE.q) { if (v.y < 0) { v.y = 0; } }
  else if (e.keyCode === KEYCODE.E || e.keyCode === KEYCODE.e) { if (v.y > 0) { v.y = 0; } }
 }

 onTouchMove(e: Touch) {
  e.getStartLocation(v2_1);
  if (v2_1.x > cclegacy.winSize.width * 0.4) { // rotation
   e.getDelta(v2_2);
   this._euler.y -= v2_2.x * 0.5;
   this._euler.x += v2_2.y * 0.5;
  } else { // position
   e.getLocation(v2_2);
   math.Vec2.subtract(v2_2, v2_2, v2_1);
   this._velocity.x = v2_2.x * 0.01;
   this._velocity.z = -v2_2.y * 0.01;
  }
 }

 onTouchEnd(e: Touch) {
  e.getStartLocation(v2_1);
  if (v2_1.x < cclegacy.winSize.width * 0.4) { // position
   this._velocity.x = 0;
   this._velocity.z = 0;
  }
 }

 changeEnable() {
  this.enabled = !this.enabled;
 }
}
PlayerController.ts:
import { _decorator, Component, Node, KeyCode, EventKeyboard, RigidBody, Vec3, v3, input, Input } from 'cc';

const { ccclass, property } = _decorator;

@ccclass('PlayerController')

export class PlayerController extends Component {
    @property
    moveSpeed = 10;

    @property
    rotSpeed = 90;

   private keyMap = {};
    start() {
        input.on(Input.EventType.KEY_DOWN,this.onKeyDown,this);
        input.on(Input.EventType.KEY_UP,this.onKeyUp,this);
    }

    setRotSpeed(value){
        this.rotSpeed = value;
    }

    private onKeyDown(e: EventKeyboard) {
        this.keyMap[e.keyCode] = true;
    }

    private onKeyUp(e: EventKeyboard) {
        this.keyMap[e.keyCode] = false;
    }

    private vec3:Vec3 = v3();
    update(deltaTime: number) {
        if (this.keyMap[KeyCode.KEY_W]) {
            Vec3.add(this.vec3,this.node.position,this.node.forward.clone().multiplyScalar(-this.moveSpeed * deltaTime));
            this.node.position = this.vec3;
        } else if (this.keyMap[KeyCode.KEY_S]) {
            Vec3.add(this.vec3,this.node.position,this.node.forward.clone().multiplyScalar(this.moveSpeed * deltaTime));
            this.node.position = this.vec3;
        }else {
        }
        if (this.keyMap[KeyCode.KEY_A]) {
            this.node.setRotationFromEuler(0,this.node.eulerAngles.y + deltaTime * this.rotSpeed,0);
        }else if (this.keyMap[KeyCode.KEY_D]) {
            this.node.setRotationFromEuler(0,this.node.eulerAngles.y + deltaTime * -this.rotSpeed,0);
        }
    }
}
FirstPersonGunCamreSc.ts:
import { _decorator, Component, Node, CCObject, Vec3, Quat, tween, Camera } from 'cc';
const { ccclass, property } = _decorator;

@ccclass('FirstPersonGunCamreSc')
export class FirstPersonGunCamreSc extends Component {
    private original_position:Vec3;
    @property(Camera)
    aniCamera:Camera = null;
    start() {
        this.original_position = this.node.position.clone();
    }

    aim(){
        tween(this.node).to(0.3,{position:this.aniCamera.node.position}).start();
        tween(this.getComponent(Camera)).to(0.3,{fov:this.aniCamera.fov}).start();
    }

    unAim(){
        tween(this.node).to(0.3,{position:this.original_position}).start();
        tween(this.getComponent(Camera)).to(0.3,{fov:45}).start();
    }

    update(deltaTime: number) {
    }

}
GunSc.ts:
import { _decorator, Component, Node, SkeletalAnimation, input, Input, EventKeyboard, misc, KeyCode } from 'cc';
import { FirstPersonGunCamreSc } from './FirstPersonGunCamreSc';
import { PlayerController } from './PlayerController';

const { ccclass, property } = _decorator;

@ccclass('GunSc')

export class GunSc extends Component {
    @property(SkeletalAnimation)
    gunSA:SkeletalAnimation = null;

    @property(FirstPersonGunCamreSc)
    FirstPersonGunCam:FirstPersonGunCamreSc = null;

    start() {
        this.playIndex(5);
        input.on(Input.EventType.KEY_DOWN,this.onKeyDown,this);
    }

    private _isaim = false;
    private onKeyDown(e:EventKeyboard){
        if(e.keyCode == KeyCode.SPACE){
            this._isaim = !this._isaim;
            if(this._isaim){
                this.aim();
            }else{
                this.unAim();
            }
        }
    }

    update(deltaTime: number) {

    }

    private playIndex(index) {
        const animatname = this.gunSA.clips[index].name;
        this.gunSA.play(animatname);
        this.gunSA.crossFade(animatname);
    }

    aim(){
        this.FirstPersonGunCam.aim();
        this.playIndex(1);
        this.getComponent(PlayerController)?.setRotSpeed(30);
    }

    unAim(){
        this.playIndex(5);
        this.FirstPersonGunCam.unAim();
        this.getComponent(PlayerController)?.setRotSpeed(90);
    }

}
Now add a render texture to the camera and related material to the monitor. As a result, we saw the street monitor footage on the TV while the drone footage was projected on the left side of the screen. Thanks to the control script, we can control it to fly around and see the effect:
Resource link
• Source code download丨Cocos Store :
• Video tutorial (UP main: Nowpaper)
• Forum discussion thread:
That’s it for today’s article. I’m Nowpaper, a father who has been involved in the game industry. If you like my sharing, you may like it and leave a message. You are also welcome to pay attention to my B station. Your support is my motivation for updating. Goodbye!