Hi CC Team!
We are testing Graphics Component for a project and we noticed that it does not support drawImage api although it’s based on web canvas’ drawing APIs. So, will there any support for it in the future?
Or any idea how we can achieve this using whatever available in Cocos Creator?
Basically, we wanted to convert our HTML5 canvas app (drawing board) to a Cocos’ project. “drawImage” is being used for painting textures on the drawing board. Please find the screenshot of the simplified app below:
Hi, there, we are simulating the API set of Canvas graphics for frontend devs to be familiar with, but it’s not based on Canvas technically.
The effect you want to achieve can be done with Mask with graphics stencil, you just set the stencil type to graphics, and use the related graphics component to draw the stencil as you normally do, and it will mask the rest of the image.
https://docs.cocos.com/creator/manual/en/ui-system/components/editor/mask.html?h=mask
1 Like
Hi hi, thanks for your reply. Please refer to the video below:
In order to work as above using mask, how are we going to arrange (the z-orders of) images? Or maybe I didn’t get your way of the solution. Please kindly explain to me again.
I was thinking about; I would need something like “drawing a part of an image on another image or canvas”. Do we have an API like that?
Each time you change a stencil image you need to add a new Node with Mask component (Graphics stencil) and the order of Mask node will determine the drawing order
Now, I roughly got the idea of you what you were saying.
Since it’s for a drawing board app / coloring app,
- whenever the user changes the coloring tool (not solid colors, they will be images)
- we will have to create a new node with mask?
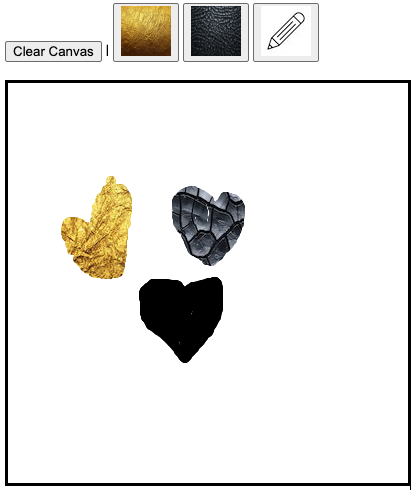
As in the video above,
- when the user selects Gold texture and paints somewhere, then we create a new node with gold
- then, when the user selects Black Leather texture, we create a new node
- then, when the user switches back to Gold, we can’t reuse the previous node with gold (since it will mess up the rendering order), and we will have to create a new node again
- if the user switches the tools a few hundred times (for a serious user, this could be the case), we will have to create hundreds nodes? Will there be any performance impact?
Please correct me if I’m wrong.
I see, in that case, what I proposed will be too heavy.
I suggest you to use directly graphics component, but with custom material
https://docs.cocos.com/creator/manual/en/ui-system/components/editor/graphics.html
Critical work to do
- Replicate builtin-graphics effect, modify it to support texture painting with uv tiling
- Whenever the brush changes, a new Graphics need to be created (for ordering), the texture need to be changed for the material instance
1 Like
I’ve done this with help of Grok AI on Creator 3.85
This is the custom effect for the custom material used for cc.Graphics, in case someone else need it
CCEffect %{
techniques:
  - passes:
      - vert: vs:vert
        frag: fs:frag
        blendState:
          targets:
            - blend: true
              blendSrc: one
              blendDst: one_minus_src_alpha
              blendSrcAlpha: one
              blendDstAlpha: one_minus_src_alpha
        rasterizerState:
          cullMode: none
        depthStencilState:
          depthTest: false
          depthWrite: false
        properties:
          mainTexture: { value: white }
}%

CCProgram vs %{
precision highp float;

#include <builtin/uniforms/cc-global>
#include <builtin/uniforms/cc-local>

in vec3 a_position;
in vec4 a_color;
out vec4 v_color;
in float a_dist;
out float v_dist;
out vec2 v_texCoord;

vec4 vert () {
    vec4 pos = vec4(a_position, 1);
    pos = cc_matViewProj * cc_matWorld * pos;  // Apply camera transformation to position
    v_color = a_color;
    v_dist = a_dist;
    // Generate texture coordinates based on local position, independent of camera
    v_texCoord = a_position.xy * 0.5 + 0.5;  // Map local [-1, 1] to [0, 1]
    // Apply manual scaling
    float scaleX = 0.01;  // Adjust this value to scale horizontally
    float scaleY = 0.01;  // Adjust this value to scale vertically
    v_texCoord *= vec2(scaleX, scaleY);  // Apply scaling after normalization
    return pos;
}
}%

CCProgram fs %{
#pragma extension([GL_OES_standard_derivatives, __VERSION__ < 300])

precision highp float;

in vec4 v_color;
in float v_dist;
in vec2 v_texCoord;
uniform sampler2D mainTexture;

vec4 frag () {
    vec4 o = texture(mainTexture, v_texCoord);
    #if __VERSION__ < 300
    #ifdef GL_OES_standard_derivatives
    float aa = fwidth(v_dist);
    #else
    float aa = 0.05;
    #endif
    #else
    float aa = fwidth(v_dist);
    #endif
    float alpha = 1. - smoothstep(-aa, 0., abs(v_dist) - 1.0);
    o.a *= alpha;
    return o;
}
}%
To use it
- Save the code above as “Custom-Graphics.effect” into project /assets
- In Cocos Assets panel, search “ui-graphics-material.mtl” from internal, copy to /assets & rename it to whatever you want (ex: “graphics-material-1”)
- Click the new material, select “assets/Custom-Graphics.effect” as effect, expand “Pass 0” & drag your texture to “Main Texture”
- Save the material
- Now in cc.Graphics component, drag “graphics-material-1” into Material box
Boom! Done
Enjoy it 