Implementation and Application of High-Performance Blur, Dual Blur, on 2D Sprites
Introduction
In game development, the creation of many effects is inseparable from image blurring algorithms. Today, let’s look at how the community developer “Yongheng’s Promise” implements multi-pass Kawase Blur based on RenderTexture.
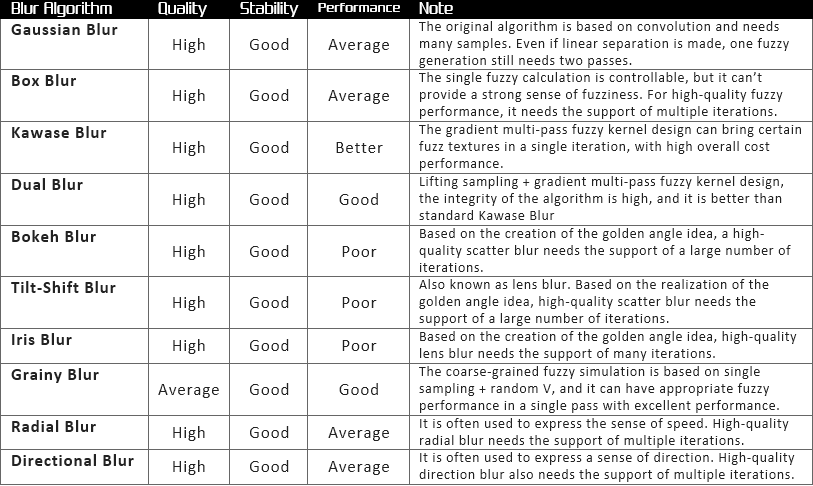
Screen Post Processing Effects is a method of creating special effects in games, which helps to improve the image effect. Image blurring algorithms occupy an important position in the field of post-processing rendering. Many effects such as Bloom, Glare Lens Flare, Depth of Field, and Volume Ray use an image blurring algorithm. Therefore, the pros and cons of the blur algorithm used in post-processing determine the post-processing pipeline’s final rendering quality and consumption performance.
Summary of ten algorithms used in the post-processing pipeline
Some time ago, because the project needed to do a background blur function, I happened to see Dacheng Xiaopang comparing several blurring algorithms in “How to Redraw Hundred Scenes of Jiangnan.” With a learning attitude, I decided to try a Dual Blur implemented in Cocos Creator 2.4.x.
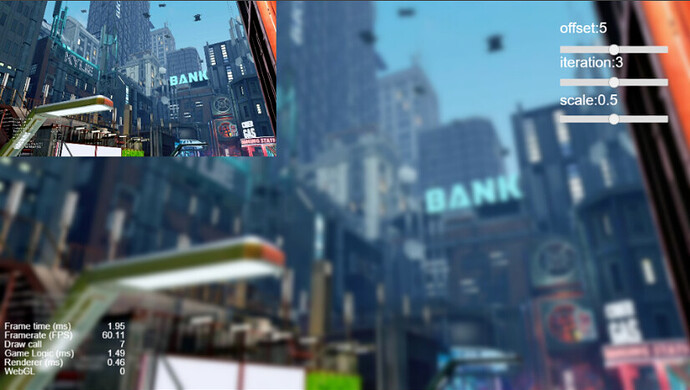
final effect
Creating multiple passes
The first question to solve is: how to implement multi-pass in v2.4.x?
Referring to the implementation scheme of Chen Pippi, multi-pass Kawase Blur is implemented based on RenderTexture. First, render the texture to RenderTexture (referred to as RT), then do a single blurring process on the obtained RT to obtain a new RT, repeat this operation, and render the last RT to the required Sprite.
Note: The RT obtained for each rendering is inverted, and the texture’s Y-axis before rendering is reversed.
protected renderWithMaterial(srcRT: cc.RenderTexture, dstRT: cc.RenderTexture | cc.Material, material?: cc.Material, size?: cc.Size) {
    // Check parameters
    if (dstRT instanceof cc.Material) {
        material = dstRT;
        dstRT = new cc.RenderTexture();
    }

    // Create temporary nodes (for rendering RenderTexture)
    const tempNode = new cc.Node();
    tempNode.setParent(cc.Canvas.instance.node);
    const tempSprite = tempNode.addComponent(cc.Sprite);
    tempSprite.sizeMode = cc.Sprite.SizeMode.RAW;
    tempSprite.trim = false;
    tempSprite.spriteFrame = new cc.SpriteFrame(srcRT);

    // Get image width and height
    const { width, height } = size ?? { width: srcRT.width, height: srcRT.height };

    // Initialize RenderTexture
    // If the content of the screenshot does not contain a Mask component, the third parameter can be passed without issue
    dstRT.initWithSize(width, height, cc.gfx.RB_FMT_S8);

    // Update material
    if (material instanceof cc.Material) {
        tempSprite.setMaterial(0, material);
    }

    // Create a temporary camera (for rendering temporary nodes)
    const cameraNode = new cc.Node();
    cameraNode.setParent(tempNode);
    const camera = cameraNode.addComponent(cc.Camera);
    camera.clearFlags |= cc.Camera.ClearFlags.COLOR;
    camera.backgroundColor = cc.color(0, 0, 0, 0);

    // Determine the camera zoom ratio according to the screen adaptation scheme
    // Restore sizeScale, zoomRatio to take a screen to RT aspect ratio
    camera.zoomRatio = cc.winSize.height / srcRT.height;

    // Render temporary nodes to the RenderTexture
    camera.targetTexture = dstRT;
    camera.render(tempNode);

    // Destroying temporary objects
    cameraNode.destroy();
    tempNode.destroy();

    // Return RenderTexture
    return dstRT;
}
You need to pay attention to cc.RenderTexture.initWithSize(width, height, depthStencilFormat) third parameter. I ignored the third parameter when I used it before. In addition, the scene is more complicated. The node that needs to be screenshotted has a Mask component, which causes the screenshot to lose all the pictures before the node where the Mask component is located.
Looking at the source code, you can know that initWithSize depth buffer and template buffer are cleared by default. When depthStencilFormat passes gfx.RB_FMT_D16, gfx.RB_FMT_S8, gfx.RB_FMT_D24S8, the corresponding buffer can be retained. Thanks to Raven for his article ["Two Ways to Implement a Single Node Screenshot"](https://mp.weixin.qq.com/s?__biz=MzUxNzg3MjE1Mw==&mid=2247491380&idx=1&sn=517573ba23b8c917657e6f1bd82109f1&scene=21#wechat_redirect) the code and comments are so elegant!
/**
* !#en
* Init the render texture with size.
* !#zh
* 初始化 render texture
* @param {Number} [width]
* @param {Number} [height]
* @param {Number} [depthStencilFormat]
* @method initWithSize
*/

initWithSize (width, height, depthStencilFormat) {
    this.width = Math.floor(width || cc.visibleRect.width);
    this.height = Math.floor(height || cc.visibleRect.height);
    this._resetUnderlyingMipmaps();
    let opts = {
    colors: [ this._texture ],
    };

    if (this._depthStencilBuffer) this._depthStencilBuffer.destroy();
    let depthStencilBuffer;

    if (depthStencilFormat) {
    depthStencilBuffer = new gfx.RenderBuffer(renderer.device, depthStencilFormat, width, height);

    if (depthStencilFormat === gfx.RB_FMT_D24S8) {
    opts.depthStencil = depthStencilBuffer;
    }
    else if (depthStencilFormat === gfx.RB_FMT_S8) {
    opts.stencil = depthStencilBuffer;
    }
    else if (depthStencilFormat === gfx.RB_FMT_D16) {
    opts.depth = depthStencilBuffer;
    }
    };

    this._depthStencilBuffer = depthStencilBuffer;
    if (this._framebuffer) this._framebuffer.destroy();
    this._framebuffer = new gfx.FrameBuffer(renderer.device, width, height, opts);
    this._packable = false;
    this.loaded = true;
    this.emit("load");
},
Dual Blur
Next, just implement the Dual Blur algorithm. First of all, let’s take a brief look at Dual Blur, here is the article “High-Quality Post-processing: Summary and Implementation of Ten Image Blur Algorithms”.
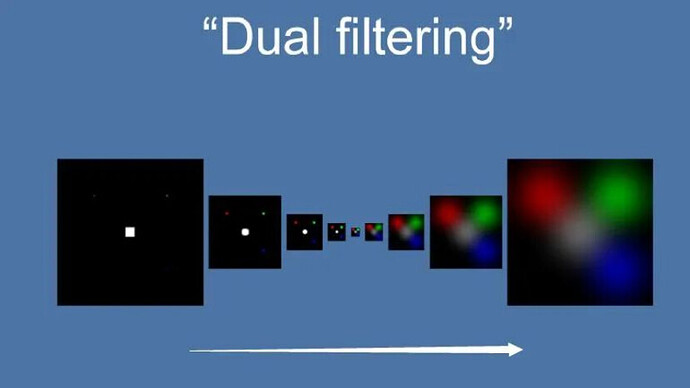
Dual Kawase Blur, or Dual Blur for short, is a blurring algorithm derived from Kawase Blur, consisting of two different Blur Kernels. Compared to Kawase Blur’s idea of ping-pong blit between two textures of equal size, Dual Kawase Blur’s core idea is to downsample and upsample the blit, i.e., downsampling and upsampling the RT.
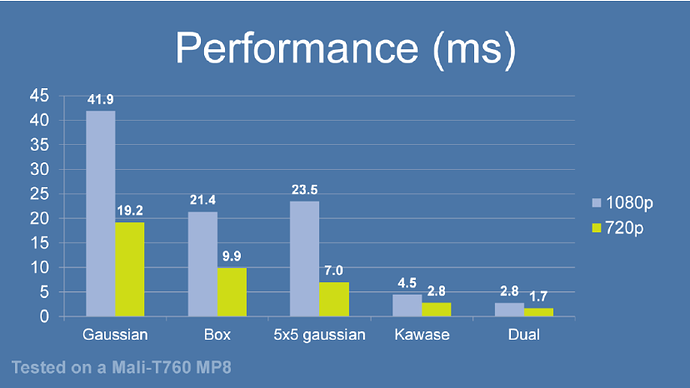
Dual Kawase Blur has relatively better performance due to the reduction of computation required for blit RT due to flexible upsampling and downsampling. The following figure is the performance comparison of several blur algorithms under the same conditions. It can be seen that Dual Kawase Blur has the best performance among them.
The uv offset can be done in the Vert Shader for better performance, while the Fragment Shader is basically sampled only.
In addition, to support the use of combined graphs, I have modified the vertex data here.
// Dual Kawase Blur
// Tutorial at:https://github.com/QianMo/X-PostProcessing-Library/tree/master/Assets/X-PostProcessing/Effects/DualKawaseBlur

CCEffect %{
  techniques:
  - name: Down
    passes:
    - name: Down
      vert: vs:Down
      frag: fs:Down
      blendState:
        targets:
        - blend: true
      rasterizerState:
        cullMode: none
      properties: &prop
        texture: { value: white }
        resolution: { value: [1920, 1080] }
        offset: { value: 1, editor: { range: [0, 100] }}
        alphaThreshold: { value: 0.5 }

  - name: Up
    passes:
    - name: Up
      vert: vs:Up
      frag: fs:Up
      blendState:
        targets:
        - blend: true
      rasterizerState:
        cullMode: none
      properties: *prop
}%

CCProgram vs %{
  precision highp float;
  #include <cc-global>
  #include <cc-local>
  in vec3 a_position;
  in vec4 a_color;
  out vec4 v_color;

  #if USE_TEXTURE
  in vec2 a_uv0;
  out vec2 v_uv0;
  out vec4 v_uv1;
  out vec4 v_uv2;
  out vec4 v_uv3;
  out vec4 v_uv4;
  #endif

  uniform Properties {
    vec2 resolution;
    float offset;
  };

  vec4 Down () {
    vec4 pos = vec4(a_position, 1);

    #if CC_USE_MODEL
    pos = cc_matViewProj * cc_matWorld * pos;
    #else
    pos = cc_matViewProj * pos;
    #endif

    #if USE_TEXTURE
    vec2 uv = a_uv0;
    vec2 texelSize = 0.5 / resolution;
    v_uv0 = uv;
    v_uv1.xy = uv - texelSize * vec2(offset); //top right
    v_uv1.zw = uv + texelSize * vec2(offset); //bottom left
    v_uv2.xy = uv - vec2(texelSize.x, -texelSize.y) * vec2(offset); //top right
    v_uv2.zw = uv + vec2(texelSize.x, -texelSize.y) * vec2(offset); //bottom left
    #endif

    v_color = a_color;
    return pos;
  }

  vec4 Up () {
    vec4 pos = vec4(a_position, 1);

    #if CC_USE_MODEL
    pos = cc_matViewProj * cc_matWorld * pos;
    #else
    pos = cc_matViewProj * pos;
    #endif

    #if USE_TEXTURE
    vec2 uv = a_uv0;
    vec2 texelSize = 0.5 / resolution;
    v_uv0 = uv;
    v_uv1.xy = uv + vec2(-texelSize.x * 2., 0) * offset;
    v_uv1.zw = uv + vec2(-texelSize.x, texelSize.y) * offset;
    v_uv2.xy = uv + vec2(0, texelSize.y * 2.) * offset;
    v_uv2.zw = uv + texelSize * offset;
    v_uv3.xy = uv + vec2(texelSize.x * 2., 0) * offset;
    v_uv3.zw = uv + vec2(texelSize.x, -texelSize.y) * offset;
    v_uv4.xy = uv + vec2(0, -texelSize.y * 2.) * offset;
    v_uv4.zw = uv - texelSize * offset;
    #endif

    v_color = a_color;

    return pos;
  }
}%

CCProgram fs %{
  precision highp float;

  #include <alpha-test>
  #include <texture>
  #include <output>
  in vec4 v_color;

  #if USE_TEXTURE
  in vec2 v_uv0;
  in vec4 v_uv1;
  in vec4 v_uv2;
  in vec4 v_uv3;
  in vec4 v_uv4;
  uniform sampler2D texture;
  #endif

  uniform Properties {
    vec2 resolution;
    float offset;
  };

  vec4 Down () {
    vec4 sum = vec4(1);
    #if USE_TEXTURE
      sum = texture2D(texture, v_uv0) * 4.;
      sum += texture2D(texture, v_uv1.xy);
      sum += texture2D(texture, v_uv1.zw);
      sum += texture2D(texture, v_uv2.xy);
      sum += texture2D(texture, v_uv2.zw);
      sum *= 0.125;
    #endif

    sum *= v_color;
    ALPHA_TEST(sum);
    return CCFragOutput(sum);
  }

  vec4 Up () {
    vec4 sum = vec4(1);
    #if USE_TEXTURE
      CCTexture(texture, v_uv1.xy, sum);
      sum += texture2D(texture, v_uv1.zw) * 2.;
      sum += texture2D(texture, v_uv2.xy);
      sum += texture2D(texture, v_uv2.zw) * 2.;
      sum += texture2D(texture, v_uv3.xy);
      sum += texture2D(texture, v_uv3.zw) * 2.;
      sum += texture2D(texture, v_uv4.xy);
      sum += texture2D(texture, v_uv4.zw) * 2.;
      sum *= 0.0833;
    #endif

    sum *= v_color;
    ALPHA_TEST(sum);
    return CCFragOutput(sum);
  }
}%
After the effect, you need to create 2 materials corresponding techniques to Down and Up. The sample code uses materialDown, materialUp to represent the two materials.
Taking a screenshot of the camera, after getting the initial RT (texture inversion), down-sampling, and blurring the initial RT to get a new RT. After repeating several times, up-sampling and blurring the final RT for the same number of times to get the final RT that satisfies the effect. When downsampling, if the scale is not 1, the RT size will be automatically rounded down, and the final effect of inversion will have black borders. Using iteration a number of times, the more obvious it is, and so there are tradeoffs if used too much.
/**
* Fuzzy rendering
 * @param offset blur radius
 * @param iteration number of fuzzy iterations
 * @param scale downsampling scaling
 */

blur(offset: number, iteration: number, scale: number = 0.5) {
    // Set source node, target sprite
    const spriteDst = this.spriteDst,
        nodeSrc = this.spriteSrc.node;

    // Set material
    const material = this.materialDown;
    this.materialDown.setProperty('resolution', cc.v2(nodeSrc.width, nodeSrc.height));
    this.materialDown.setProperty('offset', offset);
    this.materialUp.setProperty('resolution', cc.v2(nodeSrc.width, nodeSrc.height));
    this.materialUp.setProperty('offset', offset);

    // Create a temporary RenderTexture
    let srcRT = new cc.RenderTexture(),
        lastRT = new cc.RenderTexture();

    // Get initial RenderTexture
    this.getRenderTexture(nodeSrc, lastRT);

    // Multi-Pass processing
    // Note: Since textures are inverted in OpenGL, the image from an even number of passes is inverted
    // Texture size when recording lift textures
    let pyramid: [number, number][] = [], tw: number = lastRT.width, th: number = lastRT.height;

    //Downsample
    for (let i = 0; i < iteration; i++) {
        pyramid.push([tw, th]);
        [lastRT, srcRT] = [srcRT, lastRT];

    // Reduce screenshot size for efficiency
    // When reducing the size, RT will automatically round down, resulting in black borders
        tw = Math.max(tw * scale, 1), th = Math.max(th * scale, 1);
        this.renderWithMaterial(srcRT, lastRT, this.materialDown, cc.size(tw, th));
    }

    // Upsample

    for (let i = iteration - 1; i >= 0; i--) {
        [lastRT, srcRT] = [srcRT, lastRT];
        this.renderWithMaterial(srcRT, lastRT, this.materialUp, cc.size(pyramid[i][0], pyramid[i][1]));
    }

    // Use a processed RenderTexture

    this.renderTexture = lastRT;
    spriteDst.spriteFrame = new cc.SpriteFrame(this.renderTexture);

    // Flip texture y-axis

    spriteDst.spriteFrame.setFlipY(true);

    // Destroy unused temporary RenderTexture

    srcRT.destroy();

}
Thanks to Yongheng for sharing their time. I hope it can give you some inspiration and help! Welcome to go to the forum post to discuss and exchange ideas. See the code repository for the complete code:
Another great resource is “Custom vertex format by GT”


