Tutorial: Cocos Creator performance optimization: DrawCall
Probably the most comprehensive Cocos Creator DrawCall optimization guide you can find so far!
Preface
In game development, DrawCall, is a very important performance indicator, it directly affects the overall performance of the game.
Whether it’s Cocos Creator, Unity, Unreal or some other game engine, as long as it comes to game performance optimization, DrawCall is absolutely indispensable. What is a DrawCall? Why is it necessary to reduce DrawCall whenever possible?
Let’s find out!!
What is a DrawCall?
DrawCall is a behavior (instruction), which is, the CPU calls the graphics API and instructs the GPU to draw graphics.
Why reduce DrawCall?
What are we talking about when we are talking about reducing DrawCall?
In fact, what we really need to reduce is not the DrawCall behavior itself, but to reduce some performance and time-consuming behaviors before each DrawCall.
Rendering
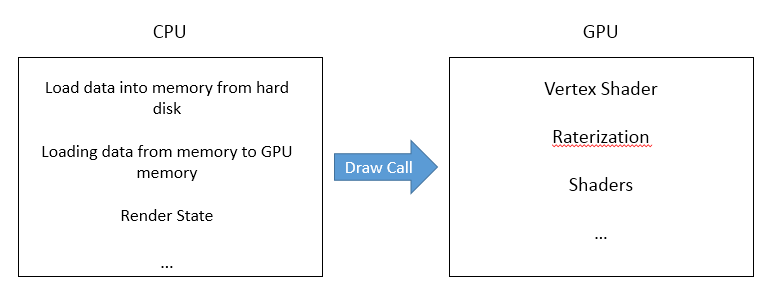
The general flow of the graphics rendering pipeline is as follows:
Note: The above figure is only a partial summary of the rendering pipeline, which is convenient for everyone to understand. The actual graphics rendering pipeline is more complicated and beyond the scope of this article.
Note: It can be seen from the figure that in the rendering pipeline, before each
DrawCall, the CPU needs to do a series of preparations to allow the GPU to render the image correctly. Every CPU read/write, data processing and rendering state switching will bring certain performance and time consumption.
Whose work is it?
Generally speaking, the GPU rendering image speed is actually very fast, so the time consumed for drawing 100 triangles and drawing 1000 triangles is not much different.
But the read and write memory of the CPU, data processing, and changing the rendering state of the GPU rendering is very, very slow.
The actual bottleneck is on the CPU side. A large number of DrawCalls will make the CPU so busy that it will be overwhelmed, and the GPU will spend most of the time waiting, which is the main reason for the decline in game performance.
The fewer DrawCalls, the better.
How to reduce DrawCalls?
When the game is running, the engine needs to render images from the top to bottom of the screen as well as in the order of the node hierarchy. So, in theory, a DrawCall is required for every image rendered (text is ultimately an image).
In this case, as long as we find a way to render as many images as possible in one DrawCall (also known as a rendering batch), we can call the CPU as little as possible, thereby reducing the amount of DrawCalls.
So we need to reduce the number of times the CPU works, but give it a lot more work every time, so you can save some steps on the CPU preparation and work requirements and hand off the work to the GPU processing. The cost is of having the CPU working all the time will take more time if more requests are asked for.
After understanding this principle, let’s see how we put this into actual game development.
Static image
The final static image is an integration of a series of smaller images into one big picture during development.
Using an atlas is very important for DrawCall optimization, but it does not mean that we can integrate all the pictures into the atlas. There are also some special points in it. If you randomly integrate the pictures into an atlas, it may become worse for optimization.
The most important thing is to try to pack adjacent fragments under the same interface (UI) with the same rendering state into one atlas to achieve the purpose of reducing DrawCalls.
Remember that the game is rendered in-order. So rendering adjacent items is very important!
Changing the rendering state will also interrupt the rendering batch, such as changing the texture state (pre-multiplied, loop mode, and filtering mode) or changing the Material, Blend (mixing mode), etc. Using a custom shader will also interrupt the batch.
For example, think about a pop-up window consisting of 10 parts and 1 text (assuming that they all use the same rendering method):
-
Without any optimization and the dynamic combination is not turned on, 11
DrawCallsare required to render this pop-up window. -
Combine all the images into one atlas. When the text node is sandwiched between the sprite nodes, 3
DrawCallsare needed, with 2DrawCallsneeded for the outermost layer at the top and the outer layer at the bottom. -
The text uses
BMFont. If all the pictures and BMFont are combined into one atlas, only oneDrawCallis needed. -
Images are not packed into the atlas and are opened through a dynamically combined picture. In an ideal situation, using
BMFontfor text requires at least 1DrawCall.
If you don’t understand the above example, please continue to read the following. I believe that you will get a better understanding of this article after reading the entire content of this article.
The dynamic combination picture and BMFont will be mentioned later.
Of course, the above example is considered to be an ideal situation. The actual problem may be more complicated, with more sprites and texts, and it may not be possible to pack all image resources into one atlas. Therefore, we can only optimize as reasonably as possible to avoid the situation over-optimizing.
It is not recommended that the size of any image resources exceed 2048 * 2048, otherwise, there may be problems in small games and native platforms.
And the larger the image size, the longer the loading time, and it is a non-linear growth. For example, loading one image takes longer than loading two images, and the gain is more than the loss.
Here are two ways to package a static atlas:
-
Auto Atlas
Use Cocos Creator’s built-in automatic atlas allows you to package images into atlases.
When the project is built, the editor will package all the images that meet the requirements in the folder where all the automatic atlas resources are located into one or more atlas according to the configuration.
Automatic Atlas has a flexible use of resources. The editor automatically creates subdirectories recursively when packaging atlas. If there are subdirectories that have Atlas resources (i.e.pacfiles) it will be skipped.
Learn more about AutoAtlas from the documentation
-
Create automatic atlas configuration
In the Explorer Panel, right-click on New → Atlas Auto Configuration and this will create a resource names
AutoAtlas.pacresource.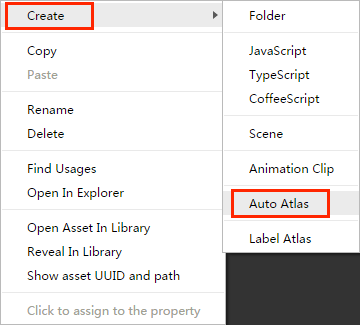
-
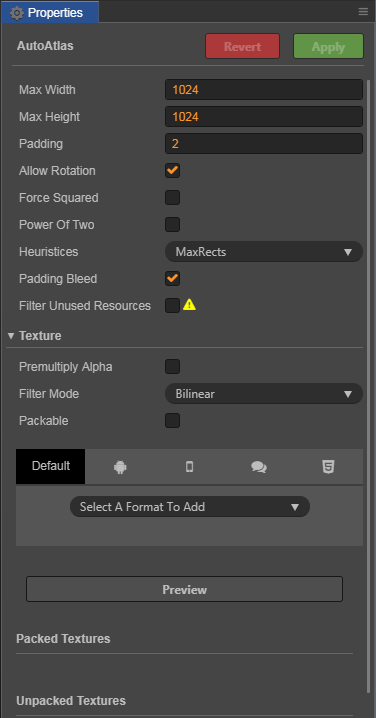
Configuration properties
In the Explorer Panel, click on the file will be automatically Atlas resources in the Property inspector to see the properties automatically in a configurable panel. Click the Preview button to preview the Atlas.
Some tips about automatic atlas
-
Properly control the maximum size of the atlas to avoid long loading times for a single image.
-
Images that are too large are not always included in the atlas (such as background images).
-
Making good use of slices can save a lot of space (this requires the cooperation of art experts).
-
Keep the default padding at 2 and keep the option of expanding edges checked to avoid image cropping errors and black edges.
-
Check the Filter unused resources option to automatically exclude unused images to save space (this option is invalid during preview).
-
Preview the atlas during development and adjust according to the results to achieve the best optimization effect.
Please refer to the official documentation for the specific role of each attribute.
-
-
TexturePacker
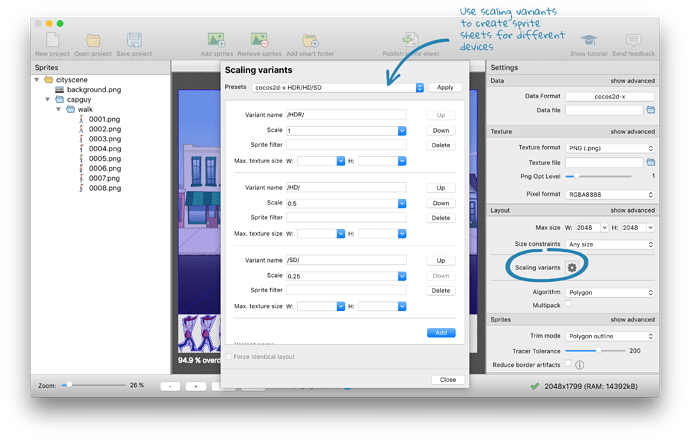
We can also use the third-party software TexturePacker to pre-package the images into atlases and import them into the project.
TexturePacker is a paid software, but in general, the free functions are enough.
TexturePacker official website
Comparison of Auto Atlas and TexturePacker
-
Auto Atlas
-
Cocos Creator is built-in, making it easy to use
-
There are not many functions, but everything that should be available is there for free
-
The atlas is only generated when the project is built, and there is no pressure to modify it during development
-
The size of the atlas is adaptive during development, saving space
-
Supports automatic texture compression
-
-
TexturePacker
-
Third-party software needs to be installed by yourself, which is not convenient.
-
Many paid functions are professional but not needed, and the free functions are enough.
-
First generate the atlas and then use it, change the image and then regenerate the atlas
-
Fixed size needs to be set by yourself
-
Compress it yourself
-
-
Summary: Auto Atlas is usually the best option
Dynamic Atlas
Here is the introduction of Dynamic Atlas that comes from the official document:
Cocos Creator provides a static atlas packing when building a project - Auto Atlas. But when the project grows bigger, the texture will become so much that it’s hard to package the textures into a large texture. At this time, the static atlas packing is more difficult to meet the needs of reducing
DrawCall. So Cocos Creator added the Dynamic Atlas, featured in version 2.0. It dynamically merges textures into a large texture while the project is running. When rendering to a texture, the Dynamic Atlas Manager will automatically detect if the texture has been merged into the atlas (Collection of images). If not, and the texture conforms to the Dynamic Atlas condition, then the texture will be merged into the atlas.
Dynamic Atlas is according to the rendering order to determine whether the texture is merged into a large texture. This ensures that adjacent DrawCall can be combined into a single DrawCall (also known as Batching).
Dynamic Atlas documentation.
To put it simply, after the dynamic combination is turned on, the engine will help us to combine the images that meet the conditions (that is, the size is less than the maximum size of the image limit) at runtime, achieving the same effect as pre-packing the atlas.
In the Cocos Engine, Dynamic Atlas has a maximum size of 2048 * 2048, the combined maximum size limit of textures are 512, the user can modify the following API:
cc.dynamicAtlasManager.maxFrameSize = 512;
Enabling dynamic image combining will take up additional memory, and the memory size used by different platforms is different. Dynamic image combining is disabled by default on mini games and native platforms, but if you still have enough memory space in your project, it is recommended to force it on:
cc.macro.CLEANUP_IMAGE_CACHE = false;

cc.dynamicAtlasManager.enabled = true;
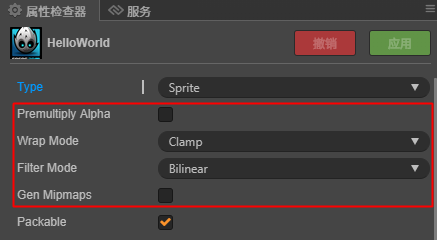
In addition, it is necessary to ensure that the Premulyiply Alpha, Wrap Mode, and Filter Mode of the texture are consistent with the dynamic atlas in order to be dynamically batched.
Static atlas can also participate in dynamic combined images
It is mentioned in the official document of dynamic combination:
When rendering a texture, the dynamic combination system will automatically detect whether the texture has been merged into the atlas. If not, and the texture meets the conditions of dynamic combination, it will be the texture Merged into the gallery.
But in fact, as long as a static texture meets the requirements of a dynamic Atlas (ie size smaller than the maximum size limit), also can participate in Dynamic Atlas.
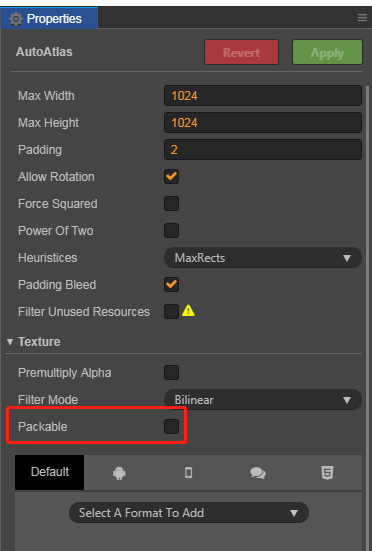
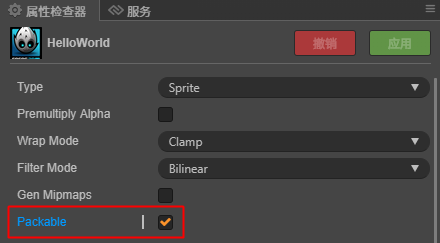
Note: Auto Atlas needs to enable the Packable option under the Texture column in its property inspector panel, which is disabled by default.
Additional supplement
Only the sprites with the Packable option enabled for textures can participate in dynamic image combining, which is enabled by default.
After the texture participates in the dynamic combination, the UV coordinates of the original texture will be modified, so the UV coordinates in the Shader cannot be calculated correctly, which causes the Shader to be invalid.
Note: If you need to use a custom Shader for the sprite, you need to disable the Packable option of its texture.
You can also disable this option in the code:
let sprite = this.node.getComponent(cc.Sprite);

let texture = sprite.spriteFrame.getTexture();

texture.packable = false;
Packable documentation.
Bitmap font (BMFont)
Labels that use system fonts or TTF fonts in the scene will interrupt the rendering and batching, especially when the Label and Sprite are stacked and interlaced. Each Label will interrupt the batching and add a DrawCall, which is a problem when a scene has a lot of text.
For the game’s text, in particular numbers, letters and symbols, it is recommended to use BMFont to replace the TTF fonts or system, and BMFont can be packed into the same atlases (or open the dynamic Graph), making them exempted from most of the text that would result in an additional DrawCall.
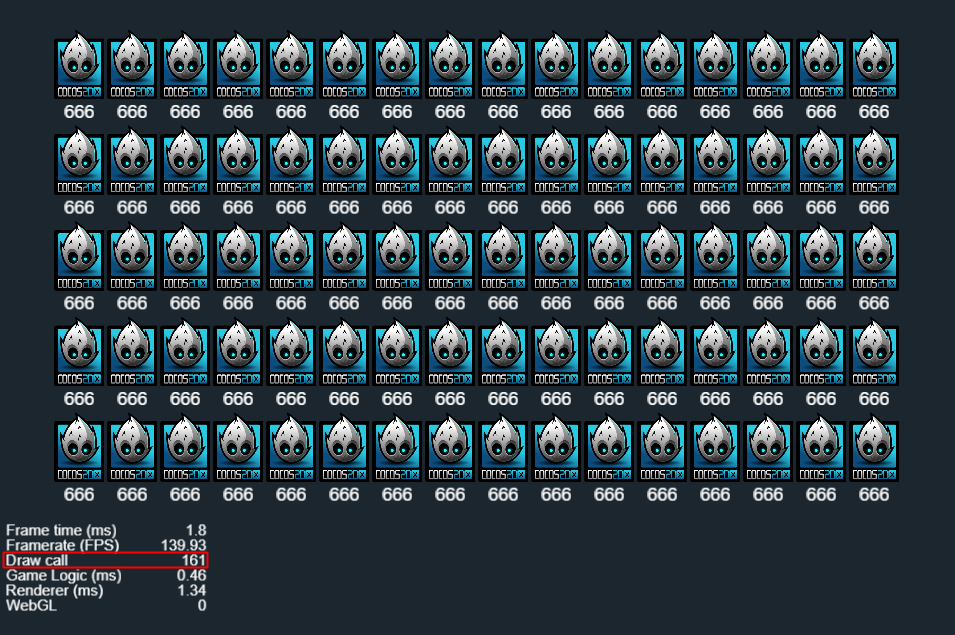
For example, there are 80 sprites and 80 texts (system fonts) interlaced in a scene. The node hierarchy is as follows:
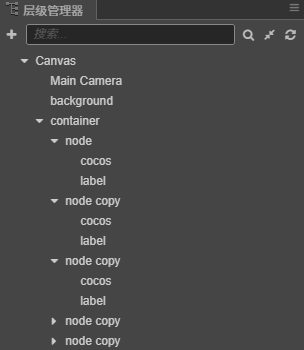
After running it, you can see that in the Debug section in the lower-left corner shows that there are as many as 161 DrawCalls, which means that each sprite and text adds a DrawCall. In this case, even if the sprite opens the atlas, it will not help.
You might be asking if there are only 80 sprites and 80 texts, shouldn’t there be 160 DrawCalls? Why is there 161…?
Because the Debug section in the lower-left corner also accounts for one
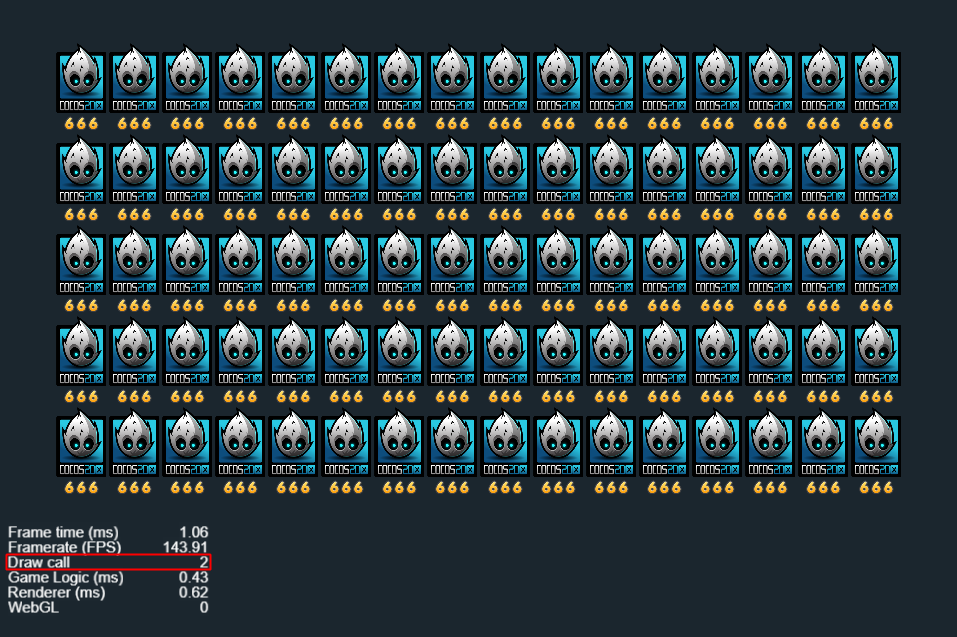
Still in the above scene, try to change the system font of the Label to BMFont and pack it into the same atlas with the sprites, the same is 80 sprites and 80 texts.
There are only two DrawCalls, and the frame time is reduced to 1ms, the frame rate is increased by 10 FPS, and the rendering time is reduced to 0.6ms.
The scene only occupies 1 DrawCall, and the other DrawCall is occupied by the debugger in the lower left corner.
Text cache mode (Cache Mode)
Cocos Creator 2.0.9 version adds the Cache Mode option to the Label component to solve the performance problems caused by system fonts and TTF fonts.
Cache Mode documentation.
Cache Mode has the following three options:
-
NONE (default)
Each Label will be generated as a separate bitmap and will not participate in the dynamic combination of images, so each Label will interrupt the rendering batch.
-
BITMAP
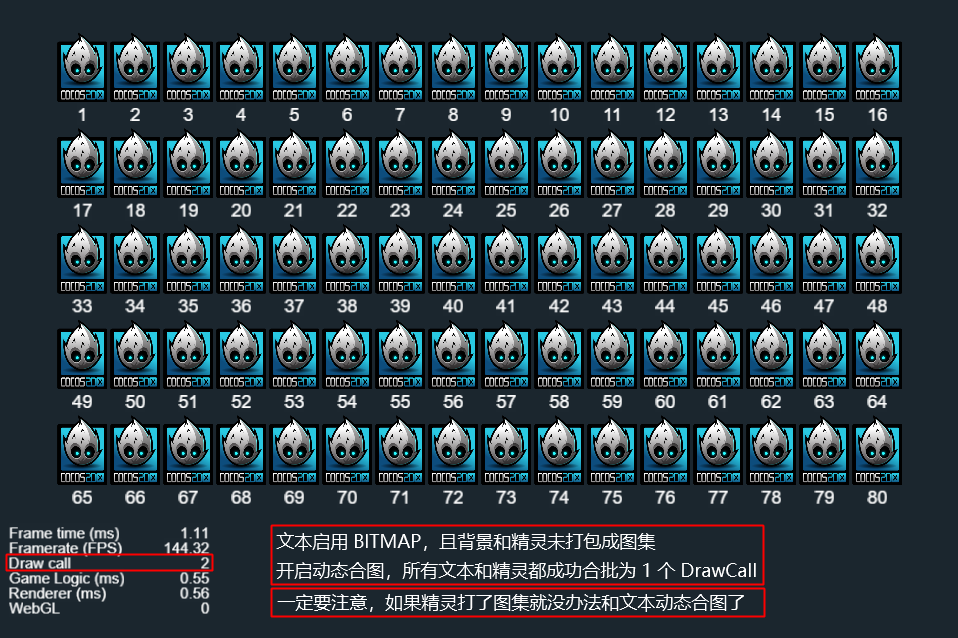
When the Label component BITMAP mode is turned on, the text will also be generated as a bitmap, but will try to participate as a part of the Dynamic Atlas if it meets the requirements.
Note: BITMAP mode is only suitable for texts that are not frequently changed, otherwise the memory will explode at your own risk!
The result is that all sprites (including background) and text are successfully combined dynamically, and the actual
DrawCallis reduced to 1.Therefore, in the current situation (less sprites and more text), it is a better choice instead of drawing an atlas.
-
CHAR
When the Label component turns on the CHAR mode, the engine will cache all the characters appearing in the Label into a globally shared bitmap, which is equivalent to generating a BMFont.
It is suitable for situations where the text changes frequently and is most friendly to performance and memory.
Note: This mode can only be used for labels with a fixed font style and font size, and a large number of unused characters will not appear frequently. Because the maximum size of the shared bitmap is 2048*2048, there is no way to render new characters, and the shared bitmap needs to be switched to clear the shared bitmap.
A label with the CHAR mode turned on cannot participate in the dynamic combination of pictures, but it can merge a
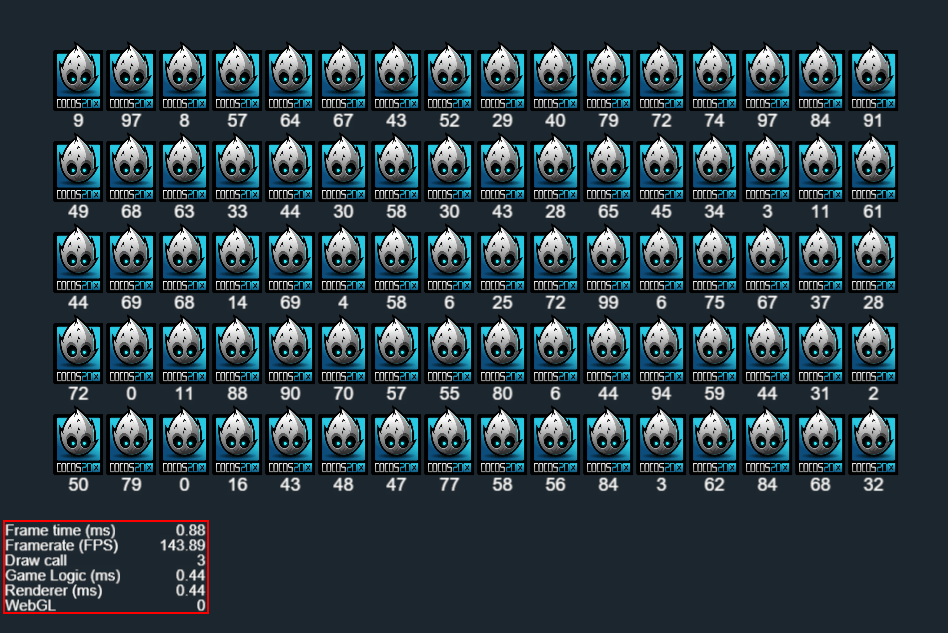
DrawCallwith the adjacent label of the same CHAR mode (equivalent to a BMFont that is not packaged into the atlas).This is the example of the interlacing of sprites and text mentioned above. In order to better reflect the advantages of the CHAR mode, I changed the structure of the scene node to separate the sprite and the text (for this you can see the UI level adjustment below).
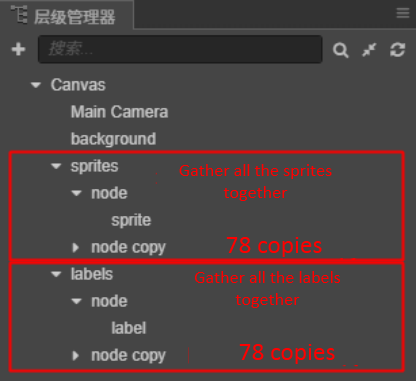
All labels turn on the CHAR mode and change the text to a new random number every 0.2 seconds in the script.
In this example, the engine will generate a BMFont containing the numbers 0 to 9 and store it in the memory at runtime. In addition, since I aggregate all the Labels together, the rendering of all the Labels is merged into one
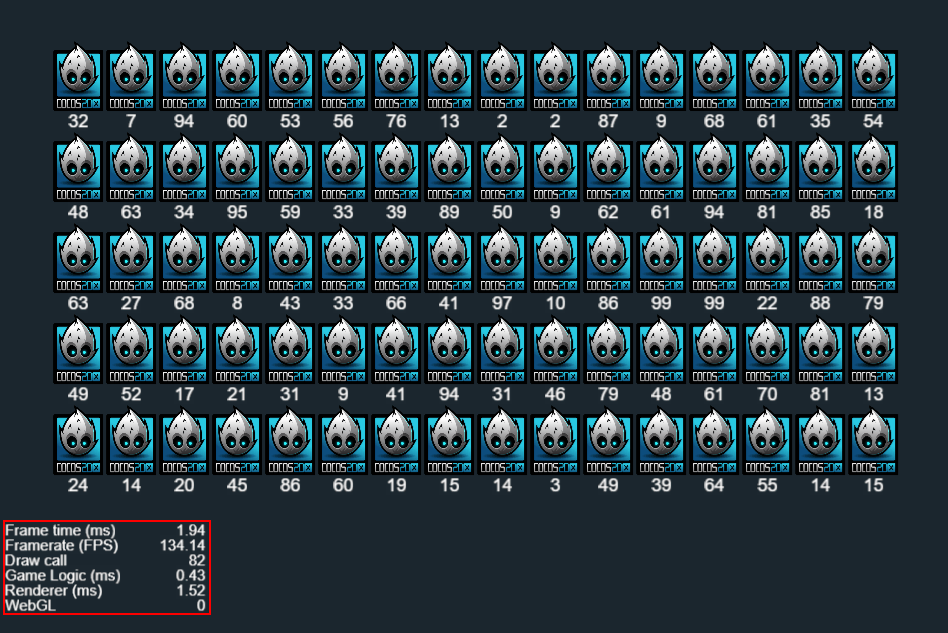
DrawCall. Please be special Pay attention to the frame time, frame rate and rendering time in the lower left corner.Looking at the above picture, it seems that you can’t see and change. Then we add a control group and set the Cache Mode option of all texts to the default NONE mode.
At this point it can be found in the frame rate is almost 2 ms, average frame rate dropped by about 6 FPS, and rendering more than quadrupled, peaking at 1.8 ms.3
To sum up
The conclusion is obvious. For a large number of frequently changed texts, the performance improvement brought by the CHAR mode is very obvious.
At the same time, the limitation of the CHAR mode is also obvious. It is generally used for a large number of digital texts in the scene.
UI level adjustment
In addition to the above optimization solutions, we can also work hard in the game scene to optimize the performance to the extreme.
In fact, also mentioned above, we can optimize the node level, separate image nodes and text nodes, text or use BMFont Cache Mode option, and more.
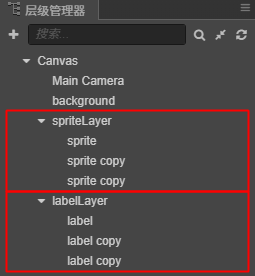
Especially for a large number of text prompts (damage value, HP value, mana value, etc.) in battle scenes or a large number of experience value texts in synthetic games, because these texts are basically numbers, even if there is more text in this way Only one DrawCall needs to be rendered.
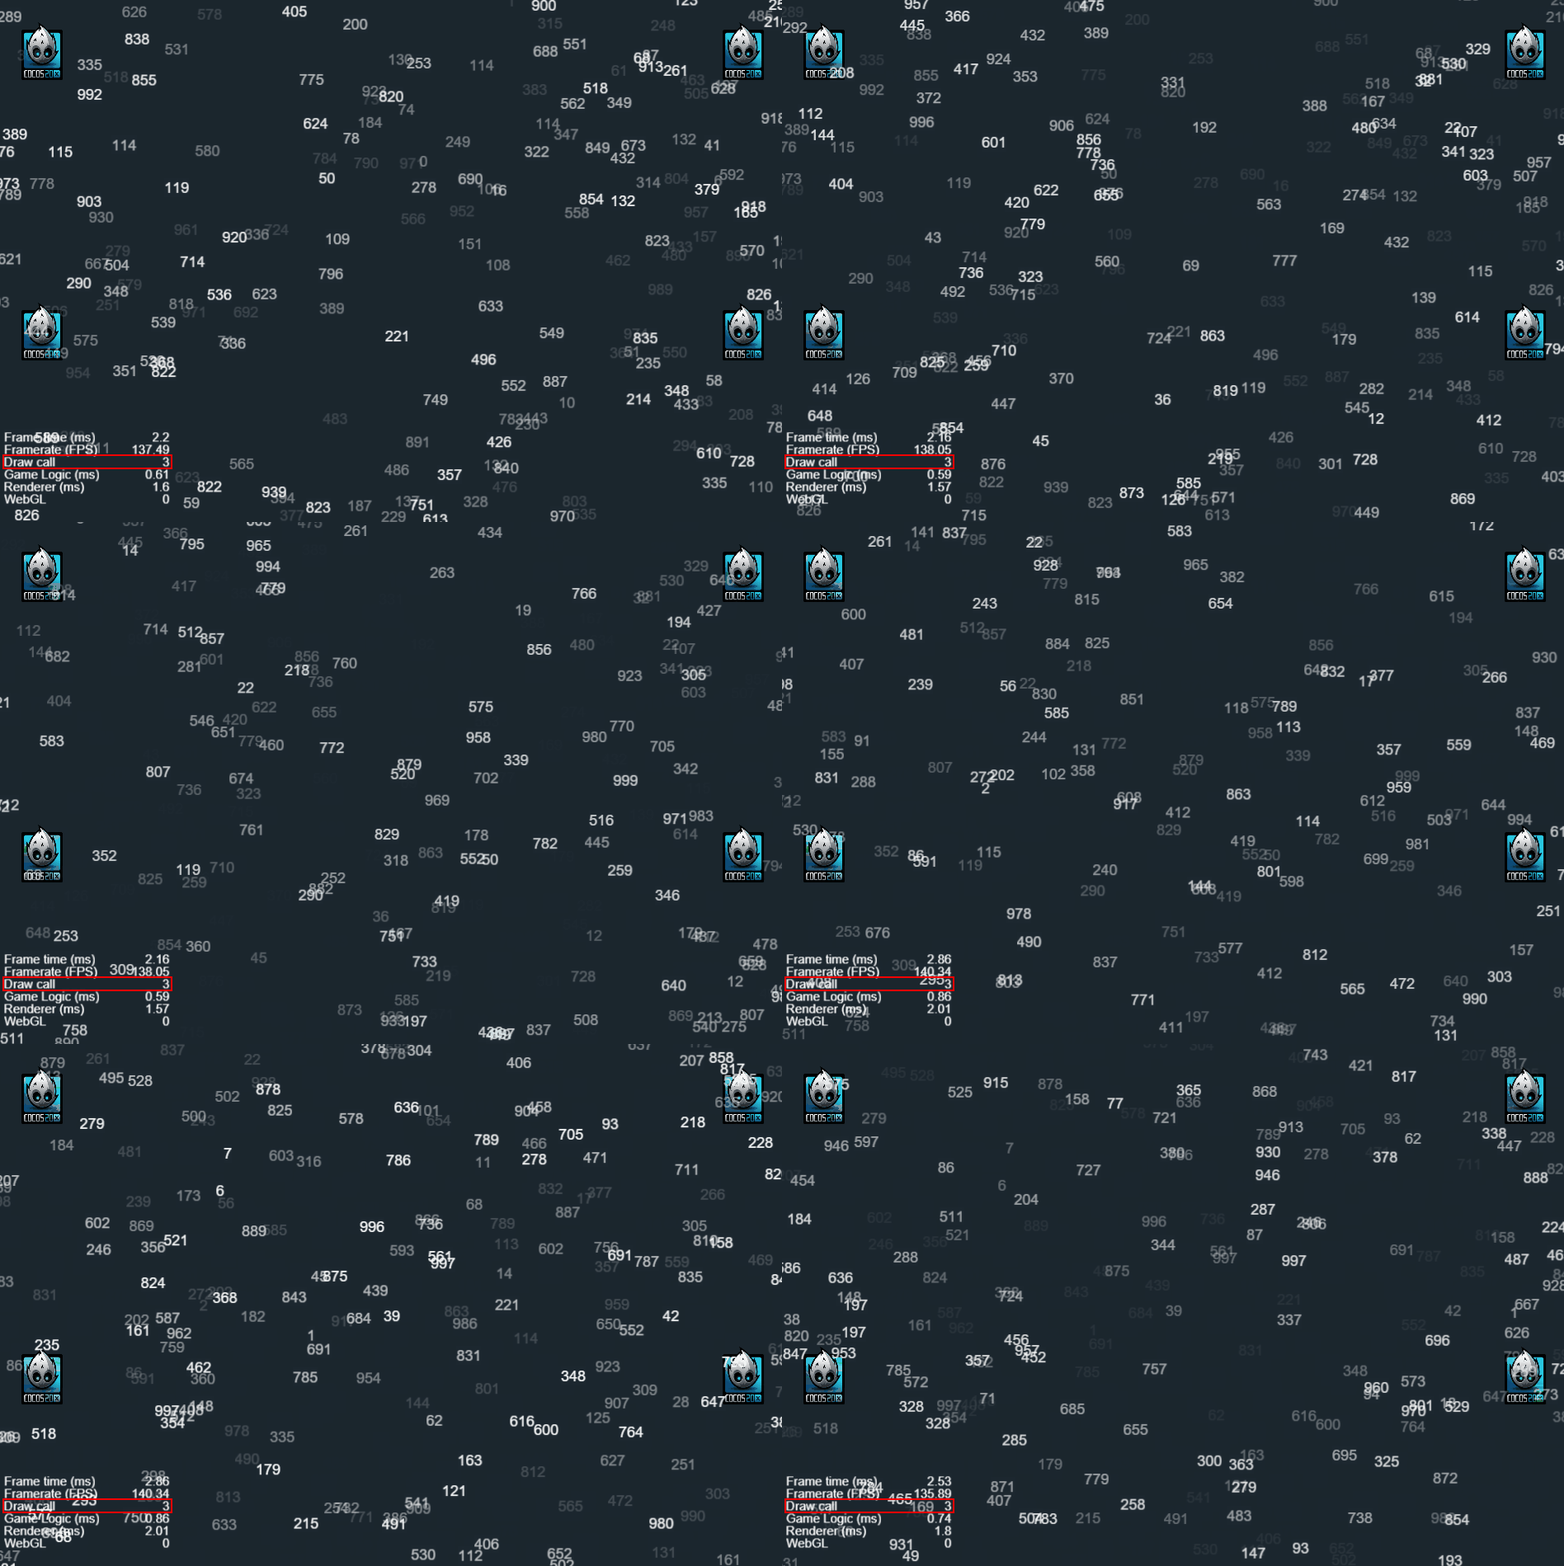
In the following scenario, the text is turned on in CHAR mode, and the script is used to generate about 50 random numbers per second. The text nodes are unified under the labelLayer node, so that all text can share 1 DrawCall, and the background and Cocos logo occupy one as well. The corner debug occupies one as well.
It can be seen that even if there are so tons of texts in the scene instantly, the overall performance is still quite impressive.
In this example, the engine generates a global shared bitmap (BMFont) containing the numbers 0 to 9 for us at runtime.
Of course, it would be better if BMFont can be used directly in Label.
Conclusion
-
Changing the rendering state will interrupt the rendering batch, such as changing the texture state (pre-multiply, loop mode and filter mode) or changing the Material (Material), Blend (mixing mode), etc., so using a custom Shader will also interrupt the batch.
-
By default, the atlas does not participate in dynamic combination. After manually turning on the Packable option of the automatic atlas resource, you can also participate in dynamic combination if the final atlas meets the requirements for dynamic combination.
-
The custom shader cannot be used after the Packable option is enabled for the texture to participate in the dynamic combination, because the dynamic combination will modify the UV coordinates of the original texture.
-
The BITMAP mode of Cache Mode needs to pay attention to the memory situation, and the CHAR mode needs to pay attention to whether the text content is too much and not repeated.
Last but not least
In the version before Cocos Creator 2.0.7, changing the color or transparency of the node, and using the slice of the Sprite component will interrupt the rendering batch.
